One year ago today I posted this piece which still remains one of my favorites:
Even though I've had the code posted online for a while, I thought it might be a good idea to walk through how it's made. Through the tutorial I'll cover a number of concepts including parameterization, 3D-vector operations, and generating 3D surfaces. Let's get started!
The Knot
To generate our knot, we need a function to describe it. We'll call this function γ (gamma). We want γ to be parameterized, meaning that for a given parameter (in this case s), we can get the coordinates of a point along the knot.
$$\gamma(s)=(x(s),y(s),z(s))$$
The specific knot used here is called a trefoil knot, and taking a look at its Wikipedia page, we find it can be described by the following parametric equations:
$$\begin{split} x(s)&=\sin{s}+2\sin{2s}\\ y(s)&=\cos{s}-2\cos{2s}\\ z(s)&=-\sin{3s}\\ \end{split}$$
where a cycle repeats every 2π. This means that if we were to vary s from 0 to 2π and plot the (x,y,z)-coordinates at each point, we would get a plot of the knot. Let's implement that.
Drawing the Knot
Let's start by creating a function, knotPath(), that gives us the knot coordinates given the parameter s. We'll store the result as a PVector. Note the scale
variable is just a global constant scaling factor we can adjust later.
PVector knotPath(float s) {
  // Returns knot path parameterized by s, s loops every 2PI

  // Trefoil Knot
  float x = sin(s) + 2*sin(2*s);
  float y = cos(s) - 2*cos(2*s);
  float z = -sin(3*s);

  return new PVector(scale*x,scale*y,scale*z);
}
Now we need to add a function that can plot the knot path from s=(0,2π). To do this, we'll create a number of evenly spaced s values from 0 to 2π, calculate their knot path
coordinates, and then connect those points. That function looks something like this:
void drawPath() {
  // Draws knot path

  int n = 100;  // number of segments
  PVector[] vectors = new PVector[n+1]; // one extra to complete loop
  float ds = 2*PI/n;  // segment spacing

  for (int i = 0; i <= n; i++) {
    // generate points along path
    vectors[i] = knotPath(ds*i);
  }

  strokeWeight(2);
  stroke(255);
  // draw path
  for (int i = 0; i < n; i++) {
    // for each point, draw a line between it and the next
    line(vectors[i].x,vectors[i].y,vectors[i].z,
         vectors[i+1].x,vectors[i+1].y,vectors[i+1].z);
  }
}
Now we just need to add some global variables and create our setup() and draw() functions. We'll be using the P3D renderer for this project, since our knot
is a 3D object. We'll also rotate our knot around the y-axis so we can get a better view. Oh and ignore the two draw() functions for now, that's necessary to add motion blur
later.
int nFrames = 160;
float t;
// Knot parameters
float scale = 20;
// Camera parameters
float cameraX = 175; float cameraY = 0; float cameraZ = 0;

void setup() {
  size(600,600,P3D);
}

void draw() {
  // Outer draw function (for adding screen effects)
  t = float(frameCount-1)/nFrames;
  draw_();
}

void draw_() {
  // Main draw function
  background(0);
  camera(cameraX,cameraY,cameraZ,0,0,0,0,-1,0);

  pushMatrix();

  rotateY(2*PI*t);  // rotate Y over time
  drawPath();

  popMatrix();
}
Let's run the code and see what we get.
The trefoil knot path.
Looks good! But we want our knot to have some volume/thickness. To do this, we're going to have to take a brief detour into calculus and vector operations.
Vector Calculus
Now, don't get too scared by the title of this section. We don't actually have to do any calculus here aside from one simple derivative. That derivative is of our knot parametrization, γ. This is calculated using the equation,
$$\gamma^{\prime}(s)=(x^{\prime}(s),y^{\prime}(s),z^{\prime}(s))$$
And we can calculate our coordinate derivatives to be,
$$\begin{split} x^{\prime}(s)&=\cos{s}+4\cos{2s}\\ y^{\prime}(s)&=-\sin{s}+4\sin{2s}\\ z^{\prime}(s)&=-3\cos{3s} \end{split}$$
An interesting property of this derivative is that for a given parameter s, it defines the tangent vector, t(s), at the point γ(s). In math terms, we can express the unit tangent
vector as,
$$\vec{t}(s)=\frac{\gamma^{\prime}(s)}{|\gamma^{\prime}(s)|}$$
This property is visualized in the figure below, where the red vector is the tangent vector. Notice that this vector points "along" (or parallel to) the path, which is what defines a tangent vector.
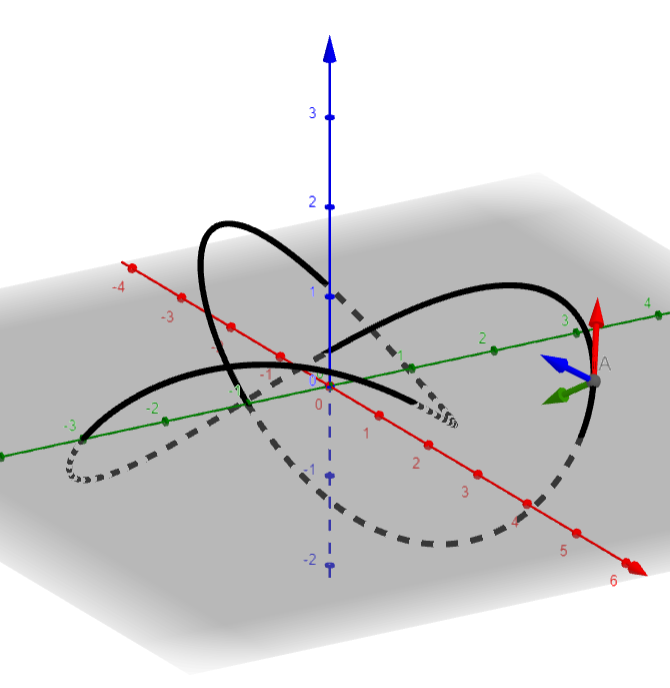
A plot of the knot path and its tangent (red), normal (green), and binormal (blue) vectors.
The green and blue vectors represent the unit normal, n(s), and unit binormal, b(s), vectors. These vectors are perpendicular (90°) to the tangent vector, and are also perpendicular to each other. They can be calculated using the equations,
$$\begin{split} \vec{n}(s)&=\frac{(1,0,0)\times\vec{t}(s)}{|(1,0,0)\times\vec{t}(s)|}\\ \vec{b}(s)&=\frac{\vec{n}(s)\times\vec{t}(s)}{|\vec{n}(s)\times\vec{t}(s)|} \end{split}$$
where ⨯ is the cross product. Note that (1,0,0) is chosen arbitrarily, and can be any nonzero vector. Using the unit normal and binormal vectors, we can generate a circle around the knot path that is perpendicular to the path. This is necessary to create a "pipe"-like effect. This circle is calculated using the equation,
$$\gamma(s)+r\cos{(\theta)}\cdot\vec{n}(s)+r\sin{(\theta)}\cdot\vec{b}(s)$$
where r is the radius of the circle. This is visualized in the figure below:
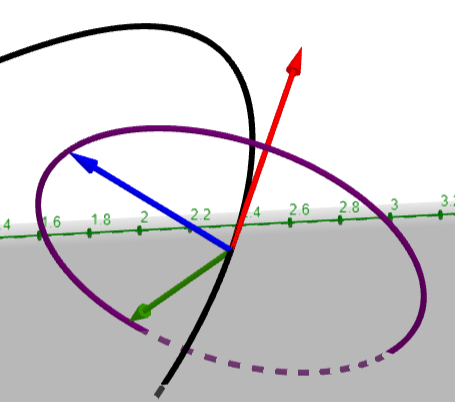
Circle drawn perpendicular to the knot path, constructed from unit normal and binormal vectors.
Now to implement it.
Adding Volume
First, let's write a function to return the unit tangent vector given s,
PVector dKnotPath(float s) {
  // Returns tangent to knot path parameterized by s, s loops every 2PI

  // Trefoil Knot
  float x = cos(s) + 4*cos(2*s);
  float y = -sin(s) + 4*sin(2*s);
  float z = -3*cos(3*s);
  PVector out = new PVector(x,y,z);

  return out.normalize();
}
Next let's write a function that returns a point along the perpendicular circle given an s and theta value. This involves implementing all of those math
formulas we went over earlier.
PVector pipe(float s, float theta, float r) {
  // Returns location on knot given parameter s along path and
  // theta around pipe surface with radius r
  // (s and theta loop every 2PI)

  // arbitrarily generate vect to cross with tangent to generate normal
  // must avoid the crossing vect from being ~ parallel to the tangent
  PVector vect = new PVector(1*s,2*s,30*s);

  PVector gamma = knotPath(s);  // knot path
  PVector tangent = dKnotPath(s);  // knot tangent
  PVector normal = tangent.cross(vect).normalize();  // knot normal
  PVector binormal = normal.cross(tangent).normalize();  // knot binormal

  // generate circle around the knot path at the given position s
  return gamma.add(normal.mult(r*cos(theta)))
              .add(binormal.mult(r*sin(theta)));
}
There is one weird thing we do here. When going over the math, I mentioned that any arbitrary vector can be used to cross with the tangent vector to get the normal vector (in the equation I used (1,0,0)). However, if this arbitrary vector is approximately perpendicular to the tangent vector, we get visual bugs in our results due to floating-point error. To prevent this, we randomize the crossing vector along the path, using some trial and error. If you can think of a way to avoid this, let me know!
Now, we need to draw our surface using our pipe() function. Similar to how we split s into pieces to draw the path earlier, we'll now split both s
and theta into pieces. We'll then get the coordinates at those pieces, and stitch them together using triangles to create our surface.
void drawSurface() {
  // Draws parameterized surface, adapted from @etiennejcb

  int n1 = 160; // s subdivisions
  int n2 = 15; // theta subdivisions

  stroke(150); // white lines
  fill(0); // black fill
  //noStroke(); // comment out for wireframe

  for (int i = 0; i < n1; i++) {  // for each s subdivision
    beginShape(TRIANGLE_STRIP);  // start shape

    for (int j = 0; j < n2+1; j++) {  // for each theta subdivision
      float s1 = map(i,0,n1,0.01,2*PI+0.01);
      // have to avoid exact 0 due to vector operations
      float s2 = map(i+1,0,n1,0.01,2*PI+0.01);

      float theta = map(j,0,n2,0,2*PI);

      PVector v1 = pipe(s1,theta,r);  // grab coordinates
      PVector v2 = pipe(s2,theta,r);

      vertex(v1.x,v1.y,v1.z);
      vertex(v2.x,v2.y,v2.z);
    }

    endShape();  // end shape
  }
}
I'd also like to shoutout Etienne Jacob here for publicly sharing code on which I based this draw function. Now let's call
drawSurface() instead of drawPath() in our draw function and see what we get:
Our trefoil knot, now with some added volume.
Now let's add some moving pieces to make it more visually interesting.
The Particle Class
To spice up our drawing we're going to add some points to move along the knot. To accomplish this, we'll bring in a class I use in many of my pieces,
class Particle {
  float s = random(0,2*PI);  // position along knot
  float theta = random(0,2*PI);  // angle along pipe/tube
  float offset = random(0,1);  // random initial offset
  float weight = random(3,4);  // base stroke weight

  void drawPoint() {
    // Draws a point at the particle's location
    // (plus some time-based movement)

    // get point on knot, move along s with t
    PVector v = pipe(s + 2*PI*t, theta, r+0.1);
    stroke(255);
    // slight shimmer effect
    strokeWeight(weight + 2*sin(2*PI*(t+offset)));
    point(v.x,v.y,v.z);
  }
}
Since every point along our knot can be defined by an s and theta value, and both loop every 2π, we can use random(0,2*PI) to generate random points
along our knot. We can then add in a time increment when calling pipe() to move our points along the knot path. And since we loop every 2π, if we multiply our time (which goes
from 0 to 1) by 2π, our particles will loop perfectly during the duration of our animation. Note that we increase the radius in the pipe() call slightly so our points do not
intersect our surface. We also add in some sinusoidal strokeWeight() variations to add a shimmer effect.
Now we just need to add in some particle initialization and draw calls into our setup and draw functions,
int nFrames = 160;
float t;
// Knot parameters
float scale = 20;
float r = 8;
// Camera parameters
float cameraX = 175; float cameraY = 0; float cameraZ = 0;
// Particle parameters
int numParticles = 1000;
Particle[] particles = new Particle[numParticles];

void setup() {
  size(600,600,P3D);

  // initialize particles
  for (int i = 0; i < numParticles; i++) {
    particles[i] = new Particle();
  }
}

void draw() {
  // Outer draw function (for adding screen effects)
  t = float(frameCount-1)/nFrames;
  draw_();
}

void draw_() {
  // Main draw function
  background(0);
  camera(cameraX,cameraY,cameraZ,0,0,0,0,-1,0);

  pushMatrix();

  rotateY(2*PI*t);  // rotate Y over time
  rotateX(2*PI*t);  // " X
  // drawPath();
  drawSurface();

  // draw particles
  for (int i = 0; i < numParticles; i++) {
    particles[i].drawPoint();
  }

  popMatrix();
}
Note we added in some x-axis rotation as well. Off-screen we also added a noStroke() call to drawSurface() to remove the wireframe. If you're wondering
why we draw the surface even though we can't see it, it's to provide a backdrop to the points so that we cannot see through the entire shape. Now let's check out the result!
Trefoil knot with some moving particles and multi-axis rotation. Notice how the video seems to stutter due to the lack of motion blur.
Almost there! Now we just need to add motion blur.
Motion Blur
Oh motion blur... Once you've tried it once, you can never go back. It makes any drawing with moving parts look a million times smoother and appealing. Since it uses some nasty bitwise operations I know nothing about, we'll be using a template developed by the amazing @beesandbombs. In short, the template works by averaging each pixel value over small time segments. This way, pixels that change in value quickly (i.e. those who include fast-moving objects) get blurred. Here's the template implemented,
...
int[][] result;
// Motion blur parameters
// number of drawings used to render each final frame with motion blur
int samplesPerFrame = 8;
// kind of the time interval used for each frame in the motion blur
float shutterAngle = 0.4;

void setup() {
  ...
  result = new int[width*height][3];
}

void draw() {
  // Outer draw function (for adding screen effects)
  // @beesandbombs Motion Blur Template
  ////////////////////////////////////////////////////////////////////////
  for (int i=0; i<width*height; i++)
    for (int a=0; a<3; a++)
      result[i][a] = 0;
  for (int sa=0; sa<samplesPerFrame; sa++) {
    t = map(frameCount-1 + sa*shutterAngle/samplesPerFrame,0,nFrames,0,1);
    draw_();
    loadPixels();
    for (int i=0; i<pixels.length; i++) {
      result[i][0] += pixels[i] >> 16 & 0xff;
      result[i][1] += pixels[i] >> 8 & 0xff;
      result[i][2] += pixels[i] & 0xff;
    }
  }

  loadPixels();
  for (int i=0; i<pixels.length; i++)
    pixels[i] = 0xff << 24 |
      int(result[i][0]*1.0/samplesPerFrame) << 16 |
      int(result[i][1]*1.0/samplesPerFrame) << 8 |
      int(result[i][2]*1.0/samplesPerFrame);
  updatePixels();
  // Template End
  ////////////////////////////////////////////////////////////////////////

  saveFrame("Output/fr###.png");
  println(frameCount,"/",nFrames);
  if (frameCount==nFrames)
    exit();
}
And the result!
The final result.
Wrap Up
Hope you enjoy the final product as much as I do! As usual, here's a Github gist containing the complete code for this project. And here's some ideas of how to alter/build upon it, some of which I've tried out:
- Try out some other knot parameterizations (see this Tweet)
- Vary what's drawn with the
Particleclass (see this Tweet) - Or completely change the surface (see this Tweet)
- Change the way the
Particleobjects move along the knot - Vary the knot radius along the path (see this Tweet)
- Add color